
Deploying a LLM to a Vectorized UDF on Snowflake using Snowpark
May 9, 2024|Read time: 6 min.
LLMs are an indispensable tool in the data science toolkit, with a wide range of applications from text summarization, classification, and sentence similarity calculations. Open-source LLMs from HuggingFace provide performant, locally hosted alternatives to commercially available closed-source models such as OpenAI’s GPT-4.
However, deploying and scaling these open-source models to operate on large volumes of data can be challenging. Thousands or even tens of thousands of calculations typically don’t pose a challenge, but what if you need to process millions or tens of millions of records?
Background
As data scientists, we are typically operating on data stored in a data warehouse such as Snowflake. Many deployment solutions involve shipping the data to another environment and/or making lots of http requests to retrieve calculations, which quickly becomes costly in terms of both time and money.
I encountered the need for a performant, scalable solution as part of a project to calculate the semantic similarity scores for millions of search keywords’ corresponding search engine results pages (SERPs).
Initial attempts at parallelization were less than fruitful: large quantities of SQL queries against our Snowflake data warehouse to pull the data took too long to resolve, and deploying the model on SageMaker resulted in additional http requests that added to the overhead.
Enter Snowpark and User-Defined Functions. I had worked with UDFs before, but to truly get value from them in this context, I needed a way to first deploy the LLM to Snowflake, then use it in a UDF — preferably a vectorized UDF for performance.
I started development with a Medium post by Fabian Hernandez as my guide, which was very instructive — big shoutout to that author! I’ve replicated some of his code from his article here. However, I encountered several hiccups and learned a lot about Snowflake and Snowpark along the way.
Step 1: Basic setup
First, you need to import basic packages and define some core variables for working with Snowflakes:
import pandas as pd
from snowflake.snowpark import Session

db_name = <YOUR DB HERE (must already exist
schema_name = <YOUR SCHEMA HERE (must already exist)>
stage_name = <NAME YOUR STAGE HERE (we will create this in the code)>
Code language: Python (python)
Next, you can set up your Snowflake session:
session = Session.builder.configs({

    "account": <YOUR SNOWFLAKE ACCOUNT>,

    "user": <YOUR SNOWFLAKE USERNAME>,

    "password": <YOUR SNOWFLAKE PASSWORD>,

    "role": <YOUR SNOWFLAKE ROLE>,

    "warehouse": <YOUR SNOWFLAKE WAREHOUSE>,

    "database": db_name,

    "schema": schema_name

  }).create()
Code language: Python (python)
Step 2: Prepare the model locally
Since Snowflake’s UDFs don’t allow external URLs to be called, we want to download and store the model locally, then upload it into a stage on Snowflake. To set up for this, we’ll download the model from HuggingFace, store it on our local machine, and compress it using joblib.
Joblib is a set of tools to provide lightweight pipelining in Python. It provides utilities for saving and loading Python objects that make use of NumPy data structures efficiently.
For this example, we’ll be using the paraphrase-MiniLM-L6-v2 model, which is available from HuggingFace.
Please note that best practice is to organize all your import statements at the top of your code; however, I’ve broken them out here to make the usage more clear.
from sentence_transformers import SentenceTransformer
model = SentenceTransformer('sentence-transformers/paraphrase-MiniLM-L6-v2')

import joblib
joblib.dump(model, 'paraphrase-MiniLM-L6-v2.joblib')
Code language: Python (python)
Step 3: Upload the model to a Snowflake stage
Now that the model is saved locally, you can upload the model to Snowflake. You can use the put method to upload the model to Snowflake.
First, you need to create the stage in Snowflake, and then you can upload the model. There’s no need to specify the auto_compress argument, as it’s already been compressed.
# Creating your stage
temp = session.sql(f'CREATE STAGE IF NOT EXISTS {db_name}.{schema_name}.{stage_name};')
temp.collect()

# Uploading the model
session.file.put(
   'paraphrase-MiniLM-L6-v2.joblib',
   stage_location=f'{db_name}.{schema_name}.{stage_name}',
   overwrite=True
)
Code language: Python (python)
Step 4: Define a helper function to cache the model
We just uploaded a compressed model to our Snowflake stage. In order to use that model, it must be decompressed. To avoid re-decompressing, we can use cachetools to cache the function results and save time.
# Caching the model
import cachetools
import sys
@cachetools.cached(cache={})
def read_model():
   import_dir = sys._xoptions.get("snowflake_import_directory")
   if import_dir:
       # Load the model
       return joblib.load(f'{import_dir}/paraphrase-MiniLM-L6-v2.joblib')
Code language: Python (python)
Step 5: Create a non-vectorized (standard) UDF
Strictly speaking, this step isn’t necessary. However, when I tried to skip straight to creating the vectorized UDF, I encountered some difficult-to-troubleshoot errors. I found this to be a helpful exercise to really understand how UDFs are created and what’s happening under the hood.
from snowflake.snowpark.functions import udf
from snowflake.snowpark.types import FloatType, StringType
import sklearn
Code language: Python (python)
@udf(
name=f'{db_name}.{schema_name}.CALC_SEMSIM',
session=session,
is_permanent=True,
replace=True,
imports=[
f'@{stage_name}/paraphrase-MiniLM-L6-v2.joblib'
],
input_types=[StringType()],
return_type=FloatType(),
stage_location=f'{db_name}.{schema_name}.{stage_name}',
packages=['cachetools==4.2.2', 'transformers==4.32.1', 'scikit-learn==1.3.0', 'sentence-transformers==2.2.2']
)
def calc_semsim(input_text: str) -> float:
model = read_model()
ref = 'cars go fast and vroom. driving is fun. engines, wheels, miles per gallon, and speed.'
# calculate the reference texts' embeddings for comparisons
ref_embeddings = model.encode(ref)
# calculate the input text's embeddings for comparisons
text_embeddings = model.encode(input_text)
# Apply the model
out = sklearn.metrics.pairwise.cosine_similarity(ref_embeddings.reshape(1, -1), text_embeddings.reshape(1, -1))[0][0]
return out
Code language: Python (python)Let’s break this down a little bit. The first part defines the UDF’s configuration on Snowflake, and the second part actually defines the function. Some important things to note about the first (configuration) part of this code:
- This is a vanilla (non-vectorized) UDF, so we define it with @udf rather than @pandas_udf
- I’ve named my function CALC_SEMSIM, as it’s intended to calculate semantic cosine_similarity
- When defining your imports, the syntax that worked for me was @{stage_name}; the absolute reference of {db_name}.{schema_name}.{stage_name} threw errors.
- However, note that the stage_location parameter needs the full stage name.
- Be sure to list all your dependencies in the packages section, and be sure you are specifying available versions of those packages.
- When defining input_types, you need to enclose the type in []. Do not use [] on the return_type specification.
- Be sure that the function you define uses the input and output types you specify. Mismatches will cause errors.
- Be sure your function is written to provide a single output. A pd.Series object does not constitute a single output; if your Series has more than one element, this will result in errors.
Once you’ve successfully deployed your UDF, it’s obviously a good idea to test it and make sure it’s working:
temp = session.sql(f'SELECT {db_name}.{schema_name}.CALC_SEMSIM(\'i have a car and i drive fast\')')
temp.collect()
Code language: Python (python)
Which yields:
[Row(<DB_NAME>.<SCHEMA_NAME>.CALC_SEMSIM('I HAVE A CAR AND I DRIVE FAST')=0.6050748825073242)]
Code language: Python (python)
Step 6: Create a vectorized version of the UDF
Once you’ve got the vanilla UDF working, it’s relatively straightforward to convert to a vectorized version. There are just a couple syntax changes to consider:
- You’ll define it using @pandas_udf instead of @udf
- The input and return_types will both change to be PandasSeriesType with additional type specifications
- You’ll need to refactor your model to operate over a vector of inputs and provide a vector of outputs
For my use case, I had an additional complication: I actually need my UDF to provide semantic similarity scores for multiple reference texts. My function refactor has to also take us from this:
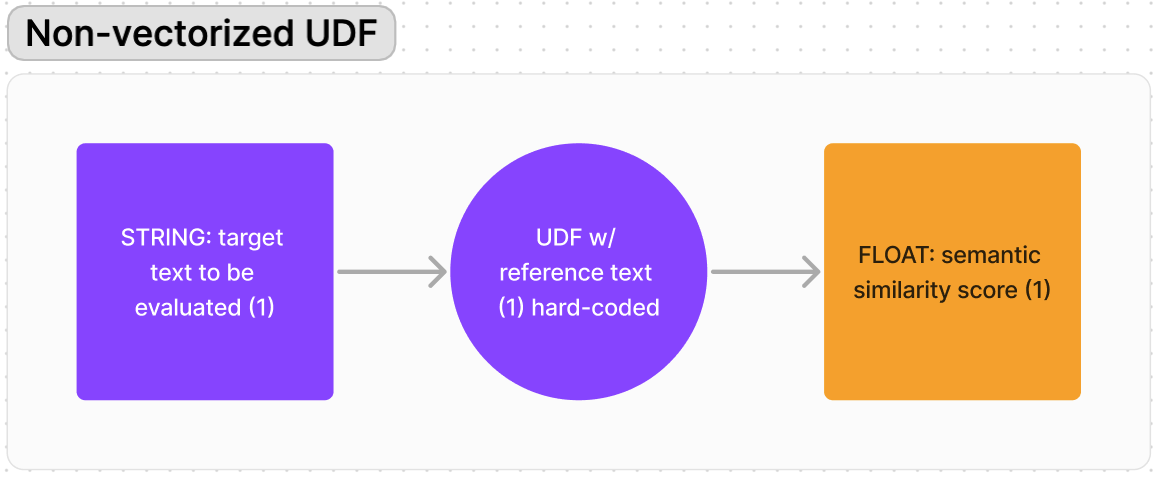
to this:

So in addition to the vectorized UDF’s batching, I am also scaling up to handle N number of reference texts. In the example below, you’ll see I have three carefully crafted reference texts about cars, cats, and Cholula.
As with non-vectorized UDFs, we still have the constraint that there must be one output per input. A pd.Series object with more than one value per input will be rejected. To get around this constraint, I have modified my function to return a JSON array of scores rather than a single float per input.
from snowflake.snowpark.functions import pandas_udf
from snowflake.snowpark.types import PandasSeriesType
Code language: Python (python)
@pandas_udf(
name=f'{db_name}.{schema_name}.VEC_CALC_SEMSIM',
session=session,
is_permanent=True,
replace=True,
imports=[
f'@{stage_name}/paraphrase-MiniLM-L6-v2.joblib'
],
input_types=[PandasSeriesType(StringType())],
return_type=PandasSeriesType(StringType()),
stage_location=f'{db_name}.{schema_name}.{stage_name}',
packages=['cachetools==4.2.2', 'transformers==4.32.1', 'scikit-learn==1.3.0', 'sentence-transformers==2.2.2']
)
def vec_calc_semsim(input_text: pd.Series) -> pd.Series:
model = read_model()
refs = {
'cars': 'cars go fast and vroom. driving is fun. engines, wheels, miles per gallon, and speed.',
'cats': 'cats are cute and cuddly. they purr and meow. they have whiskers and tails.',
'cholula': 'cholula is a hot sauce. it is spicy and flavorful. it is made in mexico. it is a condiment. it is a sauce.'
}
# calculate the reference texts' embeddings for comparisons
ref_embeddings = list(map(lambda x: model.encode(x), refs.values()))
out_combined = []
for text in input_text:
# calculate the input text's embeddings for comparisons
text_embeddings = model.encode(text)
# Apply the model
out = list(map(lambda x: sklearn.metrics.pairwise.cosine_similarity(x.reshape(1, -1), text_embeddings.reshape(1, -1))[0][0], ref_embeddings))
out = {k:v for k,v in zip(list(refs.keys()), out)}
# convert into json
out = pd.DataFrame(out, index=[0])
out = out.to_json(orient='records')
out_combined.append(out)
# convert the list of jsons into a pandas series
out_combined = pd.Series(out_combined)
return out_combined
Code language: Python (python)Again, we want to test our deployment. Here’s some SQL to create a temp table with user-entered values and test using it:
temp = session.sql(f"""
WITH ts AS (
   SELECT value AS test_strings
   FROM (
   VALUES
       ('I like to drive my car and go fast'),
       ('I have a cat and she purrs loudly'),
       ('I love cholula hot sauce')
   ) AS t(value)
)
SELECT
   ts.test_strings,
    {db_name}.{schema_name}.VEC_CALC_SEMSIM(
       test_strings::VARCHAR
   ) AS json_semsims
FROM ts;
"""
)
temp.collect()
Code language: Python (python)
And the results should look like this:
[Row(TEST_STRINGS='I like to drive my car and go fast', JSON_SEMSIMS='[{"cars":0.6089404821,"cats":0.1175091118,"cholula":0.059208937}]'),
 Row(TEST_STRINGS='I have a cat and she purrs loudly', JSON_SEMSIMS='[{"cars":0.125587374,"cats":0.6199449897,"cholula":0.0923362523}]'),
 Row(TEST_STRINGS='I love cholula hot sauce', JSON_SEMSIMS='[{"cars":0.1592703164,"cats":0.0689330325,"cholula":0.7847841978}]')]
Code language: Python (python)
And that’s it! You’ve successfully created a non-vectorized UDF that uses a LLM stored in Snowflake, then converted it into a vectorized UDF.
There’s also official documentation from Snowflake on both UDFs and vectorized UDFs. You may also want to read their docs about calling a UDF or consult the list of SQL-Python Data Type Mappings to set your input and return types.